Usage 🔭
The Lazarillo Maps Capacitor plugin ships with a web component that must be used to render the map in your application as it enables us to embed the native view more effectively on iOS. The plugin will automatically register this web component for use in your application.
For Angular users, you will get an error warning that this web component is unknown to the Angular compiler. This is resolved by modifying the module that declares your component to allow for custom web components.
Include this component in your HTML and assign it an ID so that you can easily query for that element reference later.
On Android, the map is rendered beneath the entire webview, and uses this component to manage its positioning during scrolling events. This means that as the developer, you must ensure that the webview is transparent all the way through the layers to the very bottom. In a typically Ionic application, that means setting transparency on elements such as IonContent and the root HTML tag to ensure that it can be seen. If you can't see your map on Android, this should be the first thing you check.
On iOS, we render the map directly into the webview and so the same transparency effects are not required. We are investigating alternate methods for Android still and hope to resolve this better in a future update.
The Lazarillo Map element itself comes unstyled, so you should style it to fit within the layout of your page structure. Because we're rendering a view into this slot, by itself the element has no width or height, so be sure to set those explicitly.
Now we have to initialize our plugin with the methodinitializeLazarilloPlugin(apiKey: string)
import { LazarilloMap } from '@lzdevelopers/lazarillo-maps'
const apiKey = 'YOUR_API_KEY_HERE';
const mapRef = document.getElementById('map');

await LazarilloMap.initializeLazarilloPlugin({
      apiKey: apiKey,
});
Next, we should create the map reference. This is done by importing the LazarilloMap class from the Capacitor plugin and calling the create method, and passing in the required parameters.
import { LazarilloMap } from '@lzdevelopers/lazarillo-maps'
const apiKey = 'YOUR_API_KEY_HERE';
const mapRef = document.getElementById('map');

await LazarilloMap.initializeLazarilloPlugin({
      apiKey: apiKey,
});

const newMap = await LazarilloMap.create({  id: 'my-map', // Unique identifier for this map instance
 element: mapRef, // reference to the capacitor-lazarillo-map element
 apiKey: apiKey, // Your Lazarillo Maps API Key
 config: {
    center: {      // The initial position to be rendered by the map
        lat: 33.6,      lng: -117.9,
    },
 zoom: 8, // The initial zoom level to be rendered by the map
 },
});
At this point, your map should be created within your application. Using the returned reference to the map, you can easily interact with your map in a number of way, a few of which are shown here.
const newMap = await LazarilloMap.create({...});


// Move the map programmatically
await newMap.setCamera({
  coordinate: {
    lat: 33.6,
    lng: -117.9
  }
});

// Enable marker clustering
await newMap.enableClustering();

// Handle marker click
await newMap.setOnMarkerClickListener((event) => {...});

// Clean up map reference
await newMap.destroy();
Full Examples 🍱
Basic Example with React
import { LazarilloMap } from '@lzdevelopers/lazarillo-maps'
import { useRef } from "react";

await LazarilloMap.initializeLazarilloPlugin({
      apiKey: process.env.REACT_APP_YOUR_API_KEY_HERE,
})

const MyMap: React.FC = () => {
  const mapRef = useRef<HTMLElement>();
  let newMap: LazarilloMap;

  async function createMap() {
    if (!mapRef.current) return;

    newMap = await LazarilloMap.create({
      id: "my-cool-map",
      element: mapRef.current,
      apiKey: process.env.REACT_APP_YOUR_API_KEY_HERE,
      config: {
        center: {
          lat: 33.6,
          lng: -117.9,
        },
        zoom: 8,
      },
    });
  }

  return (
    <div className="component-wrapper">
      <capacitor-lazarillo-map
        ref={mapRef}
        style={{
          display: "inline-block",
          width: 275,
          height: 400,
        }}
      ></capacitor-lazarillo-map>

      <button onClick={createMap}>Create Map</button>
    </div>
  );
};

export default MyMap;
Tap and Place Annotation
Note: The methods
addPlaceAnnotation,removePlaceAnnotation, andremoveAllPlaceAnnotationsare currently available only on iOS.
You can allow users to tap on a place in the map and then add or remove a visual annotation for that place. Here is a practical example using React:
import { useState } from 'react';
import { LazarilloMap } from '@lzdevelopers/lazarillo-maps';

const [lastTappedPlaceId, setLastTappedPlaceId] = useState<string | null>(null);
let newMap: LazarilloMap;

// Enable tap on the map
async function enablePlaceTap() {
  newMap?.startUpdatingTappedPlace((data: any) => {
    setLastTappedPlaceId(data.placeId);
    // Optionally show a toast or message
  });
}

// Add annotation to the last tapped place
async function addAnnotation() {
  if (lastTappedPlaceId) {
    await newMap?.addPlaceAnnotation(lastTappedPlaceId);
  }
}

// Remove annotation from the last tapped place
async function removeAnnotation() {
  if (lastTappedPlaceId) {
    await newMap?.removePlaceAnnotation(lastTappedPlaceId);
  }
}

// Remove all annotations
async function removeAllAnnotations() {
  await newMap?.removeAllPlaceAnnotations();
}

// In your component render:
{lastTappedPlaceId && (
  <div>
    <button onClick={addAnnotation}>Add annotation</button>
    <button onClick={removeAnnotation}>Remove annotation</button>
  </div>
)}
<button onClick={removeAllAnnotations}>Remove all annotations</button>
This enables an interactive experience where the user can tap places on the map and easily manage visual annotations.
Screenshot: The following image is a screenshot of the result you can achieve with the annotation example:
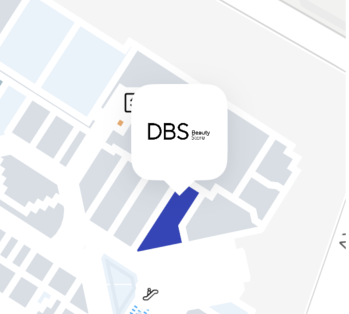
This will display your custom marker icon when the annotation is added to the map (if supported).